When you first begin using seleste, you will be in
the Guide mode which will guide you through building a query
step by step. You should come back to this document for
additional details not provided in the Guide.
When using seleste, the main window is used to select your
service, build a query, and submit your query as a job to the
server.
1. Selecting a Service
A Table Access Protocal (TAP) service is one which allows client
programs (such as seleste) to browse its table structure and
to run queries on those tables. When you click on the Services
button, you will see an alphabetical list of known TAP services for
you to choose from.
If you know of another TAP service not in the list, you can type in
the main URL of the service by using the add button in the upper right
of the Service Selection dialog.
You can be in one of three views: Form, ADQL,
or Guide. All information is preserved between Form and Guide
views and when switching into ADQL view. However, if you use
the ADQL view to type in a query you will not be able view it
in the Form or Guide views.
You can only work on building one query at
a time in one service. When you switch between
services on the Form or Guide view, seleste will attempt to preserve as much of your
query as it can between services, including any uploaded files.
Tip: If you want to start fresh with a new service, use
the Clear button to reset your query.
2. Uploading a Table
Some TAP services allow you form a query combining tables in the
service with a table you choose. After you select your service, you
can tell if uploading is available if the "Upload" button is
clickable.
You can upload either a local file, a received table, or a completed
job. You can only have one uploaded table at a time.
Local file: the file must be in VOTable format.
Received table: use any SAMP-enabled tool to send a table
to seleste.
Completed job: you can select any job which has completed and
whose output format is "votable".
Tip: If you have trouble distinguishing between completed jobs,
try setting the "Run ID" parameter in the job you wish to use.
After you have uploaded your table, you can examine the columns by
double clicking "TAP_UPLOAD.user_table" in the Contents section.
After you add columns from your uploaded table to the Output Columns,
you may want to create
a Table Join. (Use the Guide view for more information on adding Table Joins.)
3. Using the ADQL view
ADQL is a query language very similar to SQL. If you are new to
ADQL, you may want to try building queries in the Form view
then switch to ADQL view to examine how that query looks in
ADQL. Alternatively, you can save your query from any view and see
your view as it will appear in ADQL.
You should use the ADQL view if you need more query
functionality than is provided by the form.
For more information on ADQL, VOTable or SAMP, see the following:
When you add the first column to the Column Criteria, the
row will look like the following equation:
( Column1 = _______________ )
Each element in the column criteria is clickable, but some drop-down
lists may be determined by the column's datatype. To see the column's
datatype, select the row and review the information provided in the
bottom window.
1. Applying a Function
When you click on the column name in the Column Criteria you may see a list of functions
that can be applied to that column on the left side of the
equation.
If the column is of datatype "real" or "double", the available
options are as follows:
Note that this operator is only available for datatypes
"char" and "varchar".
NULL - Check if value is NULL
NOT NULL - Make sure that value is not NULL
3. Entering a Value
Most operators require a value. (The only ones which don't
are NULL and NOT NULL.) You can enter a
value for a criterion by clicking to the right of the operator and
typing in text.
Some operators require a specific format for a value:
BETWEEN requires the value to be in the format "A
and B", such as BETWEEN -1.0 and 1.0.
IN requires the values to be a comma-separated
list.
You do not need to add quotes around the value for datatypes
"char", "varchar", or "timestamp". seleste will add quotes
automatically when converting the query to ADQL. You can not include
single quotes in the middle of your value.
If the column is of type "timestamp", the value must be in the
standard FITS date format "yyyy-MM-ddTHH:mm:ss"
(e.g. 1997-07-16T19:20:15).
If the columns is equatorial RA or DEC (if its UCD value contains
"pos.eq.ra" or "pos.eq.dec"), you may put your value in sexagesimal
format. Some examples:
ra > 3h 59m 13s
dec BETWEEN +30:41:00.0 and +34:11:00.0
You may need to use decimal format if the selected service did not
provide UCDs for its columns.
You can always click on the ADQL button to preview
how seleste will convert your search criteria into ADQL.
4. Changing ANDs, ORs, and Parentheses
You may want to create a query more complex than a series of
ANDs:
(C1) AND (C2) AND
    (C3)
For example:
(((C1) OR (C2)) AND ((C3) OR
    (C4))) AND (C5))
Use the parentheses and the AND/OR dropdowns in the Column
Criteria to create your query. If you require more than four
parentheses in the query, you may need to switch to ADQL.
For the most flexibility in designing your query, you can switch to
ADQL by clicking the ADQL button at the top of the page. (Note
that any changes made to the query on this view will not be reflected
in the Form or Guide view.) We suggest you use the Form view as much
as possible and only switch to ADQL to build advanced queries.
See
the ADQL
documentation for a list of all possible functions available in ADQL.
Note that ADQL does not accept coordinates in sexagesimal
format; all coordinates must be floating point values.
5.1. Conversion of Criteria in ADQL.
The following changes are automatically performed to a Column Criteria
row when converted to ADQL:
When using the operator IN, parentheses are added
around the values.
E.g., starCount IN (6,8,10,15)
Single quotes are placed around values for datatypes "char",
"varchar", and "timestamp".
For operator BETWEEN and IN, single quotes are placed
around each value element.
For columns which are equatorial RA & DEC, the value is
converted from HMS/DMS to degrees.
A column is determined to be equatorial RA or DEC if its
UCD value contains "pos.eq.ra" or "pos.eq.dec".
Many of the Services support the ability to perform a position
search. (If not, the Position Search area will be greyed
out.) In general, you choose the table you want to search, select
the type of position search, choose the columns from the table you
want to search on, then enter the values for the search.
1. Choosing the Table
The dropdown list in the upper right of the Position Search
window contains all the tables you have added so far to the
query. (If you do not see the table you wish to use, try adding a
column from the table to the Output Columns.) We determine that
the table has has an identifiable position if any of the following
are true:
The table contains a column of datatype "point".
The table contains a column of datatype "region".
The table contains matching columns of datatype "double" or "real" with
UCDs that looks to be a LON/LAT value. (I.e., "pos.eq.ra" and "pos.eq.dec".)
The table contains columns of datatype "double" or "real" with
names that looks like a RA/DEC name. (I.e., "RA_2" and
"DEC_2".)
2. Selecting Position Search Type
Once you have selected a table with an identifiable position, you
must choose the type of position search:
Point - used to find regions which contain a
specified point. (Most useful with columns of datatype "region".)
Circle - performs a cone search
Box - performs a rectangle search
Region - used for general regions, in STC-S format
See section 6 in
the TAP
specifications for more help on the STC-S format.
For the last three types you can choose whether you want that shape to
contain, intersect, or be contained in the selected columns.
Examples:
Circle contains column(s): ra dec
This will perform a cone search using the columns ra &
dec.
Region contains column(s): sky_point
This will find all values of sky_point (of datatype
"point") which are contained in the given STC-S region.
Point is contained in column(s): obj_region
This will find all obj_region values which contain the
given point.
Box intersects column(s): obj_region
This will perform a find all obj_region values which
intersect the given rectangle.
2.1. Selecting Columns for Position Search
If the table you chose has several potential positions, you will
have to select which column or columns you would like to search
on.
Select the left-most dropdown column first. This can be a Point, a
Region, or a Longitude value. If you select Point or Region, there
will not be a second column to choose.
If you select a Longitude value, you will be presented with a
second dropdown list for Latitude. seleste tries to only show
columns with matching coordinate systems. (I.e., both equatorial or
both galactic.)
3. Selecting the Search Values
For position search type Region you need to type in your search
region in STC-S format. (I.e., "Box CARTESIAN 2.5 3.75 5 6".) For
all other types you must specify the center/point.
For most cases you probably want to use a
target name or coordinate. For a target name, you need to enter
the Name and choose the name resolver for conversion
into coordinates. For coordinates, you can type in the RA/Gal_l and
Dec/Gal_b either as decimal values or in sexagesimal format.
For Circle searches you must select a radius for the circle. For
Box searches you must select a width and height of the rectangle.
If you want to vary your point/center based on another table,
select "Other table", then select the columns on this other table to
use as the center.
If ever you want to review the ADQL generated by the Position
Search, press the ADQL button.
3.1. Example: Using Position Search for a Simple Cross-Match
Imagine you have two tables in your service, both with columns "ra"
and "dec". Here's how you would use
the Position Search to cross correlate the two tables.
Select the first table to start the Position Search.
Select "Circle", "contains", and the columns "ra" and "dec".
Select to center around "Other table"
Select the second table under the new dropdown list, and select
the columns "ra" and "dec".
Select the radius R used around the second table's ra and dec.
This will create a search for all entries where the first table's
ra/dec is within the radius R of the second table's ra/dec.
When you submit a query to a service, that service keeps track of
that query as a "Job", assigning it a unique "Job ID". seleste
will monitor the job on the service automatically. You can look at
the "Status" column at any time to see the current state of that
job.
Possible values are:
Pending - the job is ready to be started (see Run)
Queued - the service is starting to run the job
Executing - the service is running the job
Completed - the service has finished running the
job and the Results can be read
Error - the service found an error running the job
Syncing - seleste is waiting for the changes
to be made on the server
Aborted - the service was begun and later halted
(such as if you hit Stop)
Unavailable - the service does not recognize this
job
Suspended - the service has suspended running the
job, but is likely to continue the job at a later time
Held - the service could not run the job; you can try
rerunning the job at a later time
Jobs may not remain on the service for very long. You may find after
several days of using seleste that previously run jobs are in
the status Unavailable; this indicates that the service
has removed the job. You can view the Destruction parameter
to see when a job is scheduled to be removed.
Tip: If a job is Unavailable you may still be able to
use Clone to rerun the query. This only works if you have not
restarted seleste
The toolbar contains the following actions to help you manage
jobs:
Run: This starts a job running on the service. You can only
run a job in state Pending or Held.
Stop: This stops a job while it is running. You can only
stop a job in state Executing, Suspended,
or Queued.
You may want to stop a job which has been running a long
time; you can modify the query either by cloning the job or by
resubmitting the query with the main window.
Update: This can be used to immediately ask the service for
the latest status/parameters of the job. You can update multiple jobs at a time.
You can also use this option to modify the parameters.
Delete: This asks the service to delete the job from its
list of known jobs. You can delete multiple jobs at a time.
Add: If you know the Job ID of a job, you can use this
option to add the job to seleste for monitoring.
You can use this option to collaborate with other users by
sending them the Job ID of a job that you want them to examine.
Clone: This creates a clone of a job on the service. This
will create a new "Job ID" for this new job.
Use this option if you want to modify a parameter (such as
output format) of an
existing job after it has been started.
Remove: This removes the job from seleste; however,
the job still remains on the service (assuming its status is
not Unavailable). You can remove multiple jobs.
2. Job Parameters
Each job has a set of parameters that describes what it is and how the job is to
be run on the service. Not all parameters have meaningful values on
all services. If the parameter has a white background you can change
its value. The background color changes to yellow if you have a
pending change. Hit the Update button to send the changes to the service.
Here is the list of parameters for a job:
Job ID: The unique identifier given by the service. This
value can not be modified. However, you can use this field to copy
the value into your clipboard to share with collaborators.
Owner: This identifies the creator of the job and can not
be modified.
Run ID: A user-specified ID. You can use the Run ID to help
distinguish between multiple jobs.
This is especially useful if you want to Upload the results
to another query in seleste.
Destruction: The date at which the service is scheduled to
delete the job. You can try editing this value (using the same date
format), but the service may give an error when you try.
Allotted Time: This shows the number of seconds which the
job is allowed to run for, after which it will be aborted. The
special value of "0" indicates no limit.
Quote: This shows how long, in seconds, the service
estimates the job will take to run. (If blank, the service has no
quote.) This is not editable.
Format: What format would you like the results to be in?
Default is votable. This value can only be modified before the
query starts running.
Possible values are votable, tsv, csv, fits,
text, and html. The service may give an error if
it does not support the requested format.
Language: What language is the query in? This will always
be ADQL for queries generated by seleste, but
jobs created in other tools may have a different language.
MaxRec: This parameter specifies the maximum number of rows
to be returned (to protect the service from runaway queries). The
special value "0" indicates no limit.
Query: This shows the query which is associated with this
job. Most services allow you to modify the query before the job has
been started.
3. Further Information
For further information on jobs, see the following specifications:
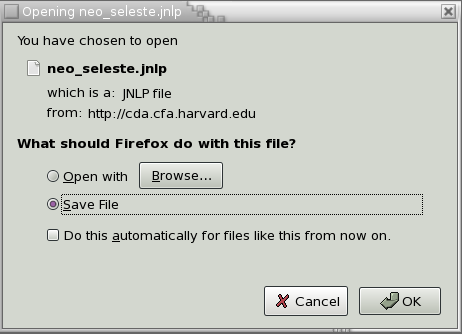
For your first time installing seleste on a Linux machine, you may
need to teach your browser what to do with a JNLP file. For example,
Firefox users will see this dialog:
You should do the following.
The Java Web Start application ("javaws") is used to run seleste. Find
your copy on your machine using the following command in a terminal window:
which javaws
If you do not have javaws in your path, you may need to ask your
systems administrators to install the latest version of java on your machine.
In the dialog, select "Open with" and hit the "Browse..."
button. Navigate to or type in the path for "javaws".
Select "Do this automatically for files like this from now on"
and hit the "OK" button.
For non-Firefox users, you can use the browsers's preferences
to set up the association between JNLP files and "javaws" or ask your
system administrator for assistance.
The seleste application requires Java 1.6 or higher to be installed on your
machine. To check your version of Java, run the following command:
java -version
If the version of Java is less than 1.6 you will need to install the
latest version from:
http://www.java.com/getjava
After the latest version of Java is installed, try launching seleste again.
Mac OS X
If you have the latest version of Java, you might try browsing through
Java Preferences. Click on the desktop (so "Finder" appears in the
upper left) and select Go->Utilities from the menu. Double click on
"Java Preferences".
Under the General tab, make sure "Java SE 6" is turned on (checked) with
the correct CPU-type for your machine. Also, be sure
"Enable applet plug-in and Web Start applications" is checked. Under
the Advanced tab you can try turning on the console to see if any
errors are displayed when launching seleste.
Mountain Lion users also may have to specifically allow access
to seleste.
To do so, go to System Preferences and select "Security & Privacy."
Then, under the General tab, change "Allow applications downloaded from:" to "Anywhere."
Linux/UNIX machines
Your browser may not know what to do with a Java Web Start file
(MIME type: "application/x-java-jnlp-file"). If so, you can set up the association as follows.
First, find the location of the Java 1.6 or later version of Java Web
Start.
which javaws
This program should be in the same directory as java.
Next, you need to set up your browser to run this program when it
finds a Java Web Start file.
For Mozilla-based browsers, edit preferences and click on the
Application tab. Search the list for content type "Java Web Start",
click on the action drop down and select "Use other...". Select the
Java 1.6 or later version of "javaws" and click "Open".
For other browsers, you may need to research how to configure the
browser to recognize the Java Web Start type.
If you see a dialog which says "The internal database is
unavailable.", seleste thinks that you have another session
of seleste running on your machine. You can still
run seleste, but it will not remember which jobs or services
you add (nor will it recall which you added before).
The lock file used to determine if another session is running
is in the directory .seleste under your home directory.